Would you have imagined that at some point in time you would be able to access the Internet directly from your Television? Well, it’s the era we are now living in. And the increased popularity of video streaming services makes it all the more convenient.
But what happens if you are using the older generation televisions that don’t have the smart TV capabilities? There are special streaming devices specifically built for that purpose.
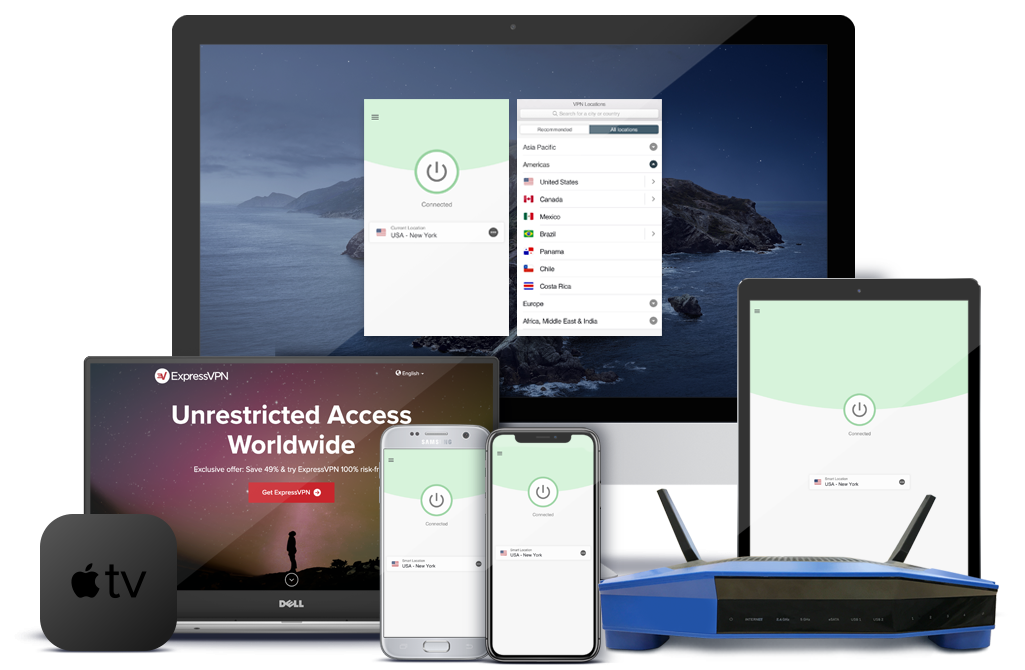
The Apple TV is one such device that you plug into your TV’s HDMI port and you will be able to watch videos, listen to music and even play games directly from the internet.
If you have an iOS device or Mac computer then you can use the Airplay feature to cast video and audio content to your TV via Apple TV. The streaming device also allows you to mirror your iOS screen to your TV which will be great for activities such as browsing and playing games.
But you probably know that already. What you are interested in knowing is which is the Best VPN for Apple TV. But before we can get to that what are the benefits of using a VPN with Apple TV?
Why do you need a VPN for Apple TV
The most prominent reason is to unblock restricted content. All the popular streaming services including the newly introduced Apple TV+ have different libraries for each country. A show that is available on Netflix US may not be available in Netflix Australia.
A VPN helps change your IP location to a different country allowing you to view content that would otherwise be inaccessible from your region.
Moreover, a VPN encrypts your data allowing you to stay hidden from snoopers on the internet. Websites cannot track your browsing history and your ISP cannot monitor your online activities.
This consequently means that your ISP cannot deliberately slow down your internet as is usually the case when they notice a huge consumption of bandwidth on your end.
Unfortunately, before you can use a VPN on Apple TV, there is one major hurdle that you have to overcome. Apple TV does not support the installation of a VPN on its hardware. Therefore, you have to resort to alternative methods like installing the VPN on a router which is a little technical.
We will explore this further later in the post where I will also give you additional methods to use if you want to use a VPN on Apple TV.
Best VPNs for Apple TV
Before we can get to the main reviews here is a rundown of the 5 VPNs that we recommend for Apple TV.
- ExpressVPN – No VPN list roundup would be complete without Express VPN. Whether you are talking about VPNs for streaming, security, or even speed. It ticks all the right boxes. ExpressVPN claims to be the number 1 trusted solution on their website. A bold claim but one they actually live up to.
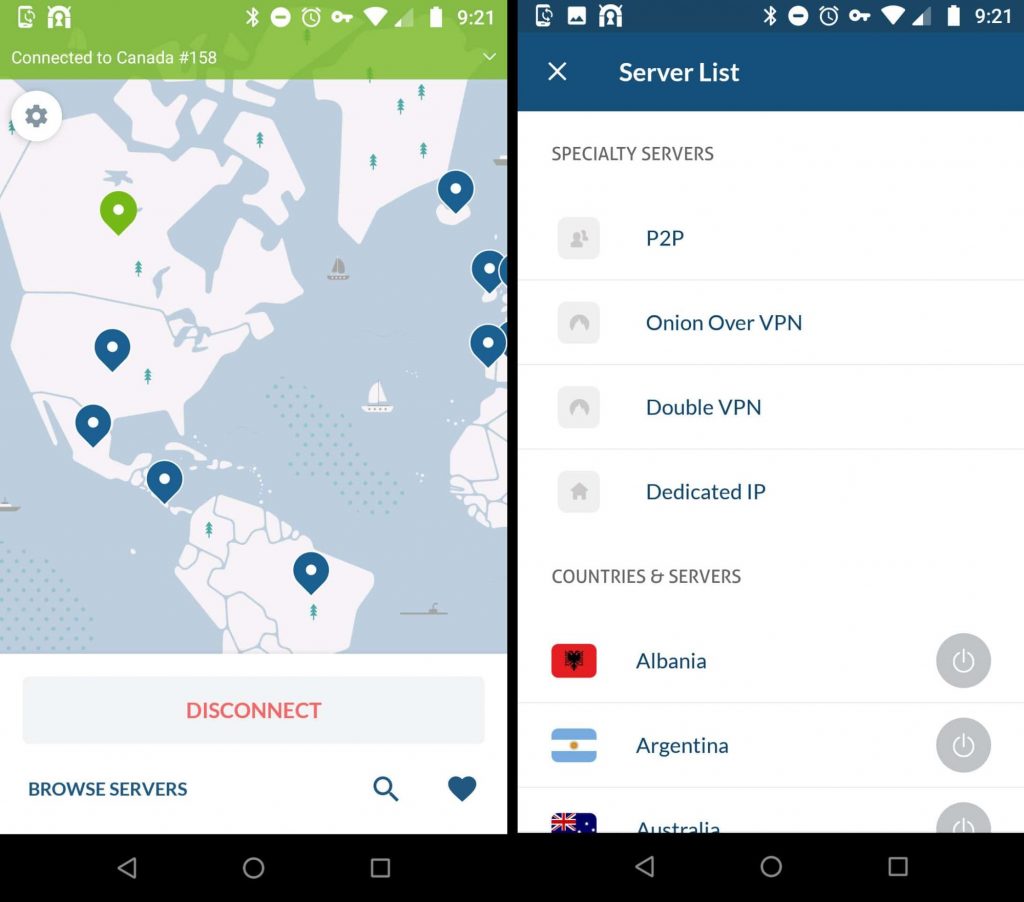
- NordVPN – NordVPN currently stands as one of the most secure solutions thanks to its double-layered security. It allows you to add the Onion network over the standard VPN connection. But more importantly, it can be used to unblock all the popular streaming services and provides great speeds to ensure quality streaming.
- CyberGhost – CyberGhost takes all the features that matter in a VPN and packages them into one affordable solution. Looking at its price plans it would be hard to believe that it’s the number one VPN in terms of the total number of servers worldwide.
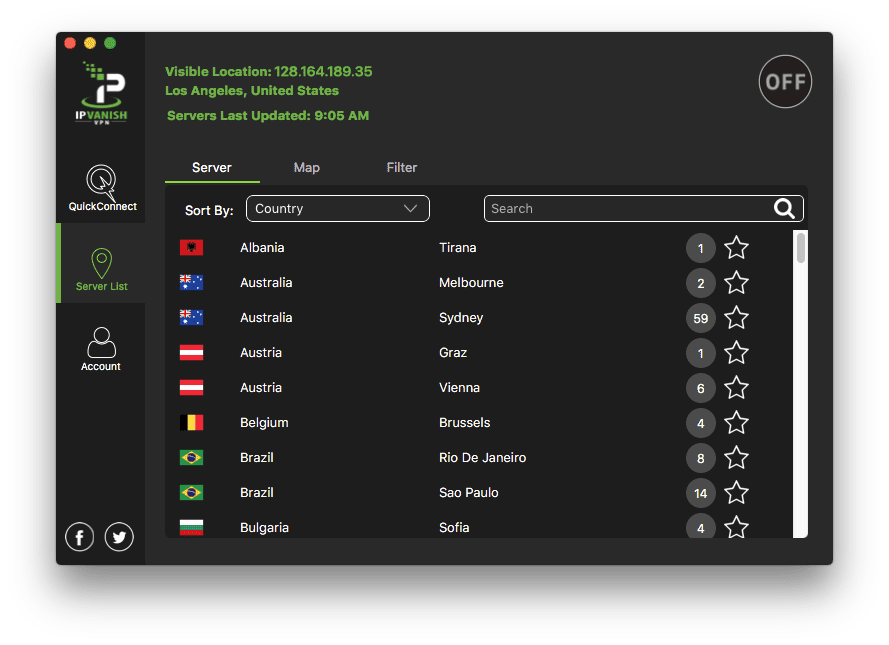
- IPVanish – This US-based VPN owns and operates all their servers and can, therefore, guarantee reliability and consistent connection speed to its users. It’s an all-rounded VPN that will be just as good in unblocking Netflix as it is in securing your online connections.
- PrivateVPN – You don’t survive 10 years in the competitive VPN market if you have nothing to offer. And that is precisely what PrivateVPN has done. The VPN may have a limited portfolio of servers but it’s an excellent option to unblock all the popular streaming services while providing you full anonymity when online.
Which criteria did I use to come up with this list of VPNs?
Factors to Consider When Choosing a VPN for Apple TV
- Can be Installed on a Router – Since Apple TV does not allow the installation of a VPN on its hardware, the other best alternative is to install the VPN on your router which would consequently protect all the other devices connecting to the internet via that router.
- Has not been blacklisted by the streaming services – The streaming service providers have come up with a way to detect and block VPN connections which have affected a lot of VPN vendors. Make sure that your VPN of choice is not one of them.
- Connection speed – Any VPN that you use will slow down your connection speed due to encryption and the additional routing of your data through the VPN servers. However, a good VPN should not ruin your streaming experience with constant buffering and poor quality video.
- Server coverage – The longer your traffic travels to reach a VPN server the slower the connection speed. A VPN should have its servers widely distributed to increase the chances of the user finding one that is near to them.
- Customer support – If you experience a problem with a VPN how long do they take to resolve the issue?
- Security and privacy – This may not be your number one priority when looking for a VPN for Apple TV but a good VPN should employ the best security protocols to ensure that you remain anonymous when online.
1. ExpressVPN
I am yet to come across a VPN that is as consistent in unblocking streaming services as ExpressVPN. It’s given that at some point in time a VPN will get discovered and blocked by your streaming service but what matters is how fast they respond.
In those rare instances when ExpressVPN has been discovered by Netflix, Hulu or the others, they are very quick to update their IP addresses or configure a new server that has not yet been blacklisted.
This VPN solution is compatible with multiple devices such as iOS and Android phones and computers running on Windows, Mac, and Linux OSes. But most importantly, it can be configured on a router.

If your router is not among the supported models then you can make use of the ExpressVPN MediaStreamer feature which allows you to change the DNS settings of your Apple TV. You will still be able to access geographically restricted content but unfortunately, your data will not be encrypted.
Here is a step by step guide of using MediaStreamer on your Apple TV(4th gen, 5th gen, tvOS) and Apple TV(1st, 2nd, 3rd gen)
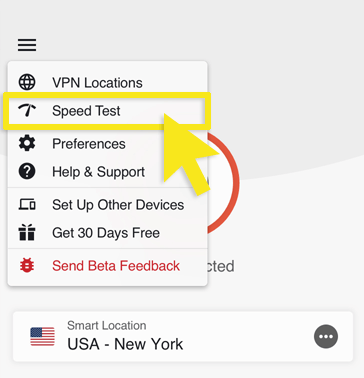
ExpressVPN has 3000+ servers distributed over 160 locations in 94 countries. These servers provide unlimited bandwidth allowing you to get the best streaming quality. You can even make use of the speed test feature to select the best performing server.
In terms of security, ExpressVPN uses OpenVPN connection protocol combined with AES 256 bit encryption which makes it almost impossible for hackers to steal your personal data.
ExpressVPN comes with a 30-day money-back guarantee which is a lot of time to test the product. If you are not satisfied with it then go ahead and request a refund.
Read Full Review
Pros
- A well-distributed collection of servers
- Excellent streaming speeds
- Excellent customer support
- Quick remediation process when discovered by the streaming services
Cons
- Has no free trial
2. NordVPN

When people talk about NordVPN, usually it’s the security aspect of it that gets the most mentions. About how on top of using OpenVPN connection protocol coupled with AES 256 bit encryption, the VPN also allows you to add another layer of security by enabling the Onion network.
But aside from that, NordVPN has been very successful in unblocking geo-restricted content. In our tests, it was able to unblock Netflix, Prime Video, Hulu and even Apple TV+. I was also able to access BBC iPlayer which is only available in the UK.
What’s more, the VPN’s effect on connection speeds was barely noticeable. The videos played in full HD for the most part and I did not experience any buffering. NordVPN boasts of an impressive 5100+ total number of servers which is one of the reasons for the great streaming speeds. More servers mean there is less competition for bandwidth since users do not congest on one server.
The maximum number of devices you can protect using a single license of this VPN is six but you can also configure it on a router allowing you to protect all other devices that connect to the internet via the router.
The NordVPN customer support is available on both email and live chat.
The VPN does not have a free trial but you can try it risk-free for 30 days. If you are unsatisfied during this period then you can request for refund.
Read Full Review
Pros
- Huge collection of servers
- Unblocks all the popular streaming services
- Offers a double layer of security
- 30-day money-back guarantee
Cons
- Lacks specialized servers for streaming
3. CyberGhost
CyberGhost currently stands as the number one VPN with the most servers worldwide. That is 5900+ servers distributed over 88 countries. And that should immediately assure you that poor connection speed is not something you will experience when using this VPN.
The widespread distribution of servers means you can easily find one that is closest to you for optimum speed and the high number of servers means that there is no competition for bandwidth.
Additionally, unlike most of the other solutions, CyberGhost comes with optimized streaming servers for all the popular video providers like Netflix, Hulu, Prime Video and BBC iPlayer. There is no specialized server for Apple TV + yet but as the streaming service continues to gain popularity am certain they will include one.
But don’t just limit yourself to the specialized servers especially because they are only available for a few locations. The normal servers can also be used to unblock restricted content.
CyberGhost is compatible with OpenVPN protocol which combines with AES 256 bit encryption to provide the perfect balance between security and speed. If you are experiencing any streaming issues, which I did not, you can switch to other protocols such as IKEv2 and L2TP. They are less secure but have better streaming speeds.
CyberGhost comes with a one-day free trial but it’s limited meaning you have to purchase the premium plan to fully experience the product. Don’t worry though they give you a 45-day money-back guarantee.
Read Full Review
Pros
- Huge collection of servers
- Dedicated servers for streaming
- 45-day money-back guarantee
- Very affordable if you opt for the long plan
Cons
- The 1-day trial is very limited
4. IPVanish
IPVanish is a US-based VPN that comes with 1300+ servers distributed over 75 different countries. The VPN owns and manages all its servers and they put a lot of emphasis on providing fast connection speeds.
From a security standpoint, the US is not the best location for a VPN considering that they are the most notorious member of the 5 eye alliance when it comes to spying on their citizens.
However, IPVanish maintains that they don’t store user data so even if the government came knocking then the VPN company has no info to give out. Moreover, the VPN uses OpenVPN protocol that is reinforced through AES 256 bit encryption which is a nightmare for anyone trying to snoop into your online activities.
But if there are still any misgivings about the security aspect of IPVanish I bet they will dissolve once you hear about how it performs in regard to streaming.
The VPN can be used to unblock all the popular streaming services including Netflix and Apple TV+. And to top it off, it has a stealth mode which allows it to disguise VPN traffic as normal traffic and, therefore, evade detection.
On the downside, this VPN only offers a 7-day money-back guarantee and they don’t even have a free trial. And although a week is enough to test and understand the product it does very little to help IPVanish compete with other VPNs like Express and Nord that offer a 30-day money-back guarantee.
Read Full Review
Pros
- The company owns and self-manages its servers
- Can disguise VPN connection as a normal connection
- Works with all the popular streaming services
- Widespread server locations
Cons
The 7-day money-back guarantee could be more
5. PrivateVPN
With slightly over 100 servers worldwide, some might find it surprising that PrivateVPN has made it to our best 5 VPNs but I can promise you this VPN can hold its own. They have done a great job distributing the servers over 60 countries which allows you to easily find one that is nearest to you for the best performance.
Also, PrivateVPN is quite affordable and unlike CyberGhost which requires that you purchase a 3-year plan to get the best price, this VPN has a 3-month plan and a 13-month plan that respectively costs $4.88 and $3.82 per month.
The VPN also manages to outdo some of the bigger names by staying undiscovered by the streaming services. It will help you unblock Netflix, Prime Video, Hulu, and even Apple TV+.
And you don’t have to worry about the quality of your streaming because PrivateVPN does not affect your internet speed in a big way. In our tests, there were minor fluctuations in the video quality but they only lasted less than a minute and the video was back to full HD.
The video also took a longer time than usual to load but once it started playing there was no buffering.
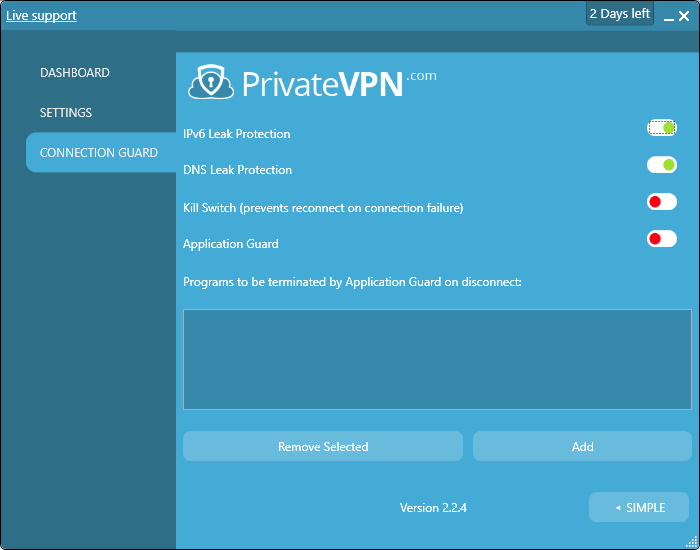
All traffic being sent via PrivateVPN connection is encrypted using 2048-bit Encryption with AES-256 and is transmitted through the OpenVPN connection protocol. Additional protocols supported include PPTP, L2TP, IKEv2 And IPSec.
PrivateVPN does not have a free trial but it comes with a 30-day money-back guarantee.
Read Full Review
Pros
- Widespread distribution of servers
- Can unblock all the popular streaming services
- Very affordable
- 30-day money-back guarantee
Cons
- Number of servers could be more
How to Use a VPN with Apple TV
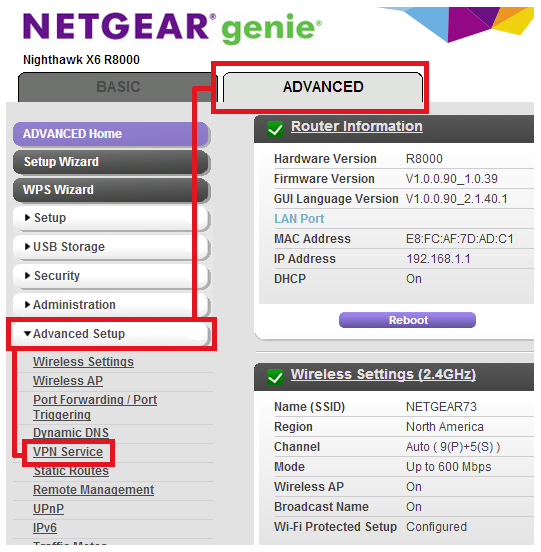
Install the VPN on your router
I won’t get into the process of installing a VPN on your router because it is different for each router type and model. However, there are a few things I should mention.
First, not all routers support VPN installation by default. So, the first thing you should do is search “How to install a VPN on (your router model)”. If nothing comes up then your other option is flashing your router with custom firmware like DD-WRT or Tomato.
Note that the flashing process can be tricky and, therefore, if you are not confident about it consider upgrading your router to one with a pre-installed VPN or try our alternative method of setting up a VPN on Apple TV which we have discussed below.
If your router supports VPN installation by default, then it will come with a built-in VPN client on which to configure your VPN.
2. Use your Windows or Mac Computer as a Virtual Router for Apple TV
If you are using an old model router that does not have a VPN client and you are afraid to brick the router when flashing a custom firmware then this is the best method to use. If you follow my step by step guide below then you should have your VPN working with Apple TV ASAP.
How to Create a VPN-Protected Hotspot on Windows
- Launch your VPN and connect to the server you want to use. Make sure the VPN is using OpenVPN connection protocol.
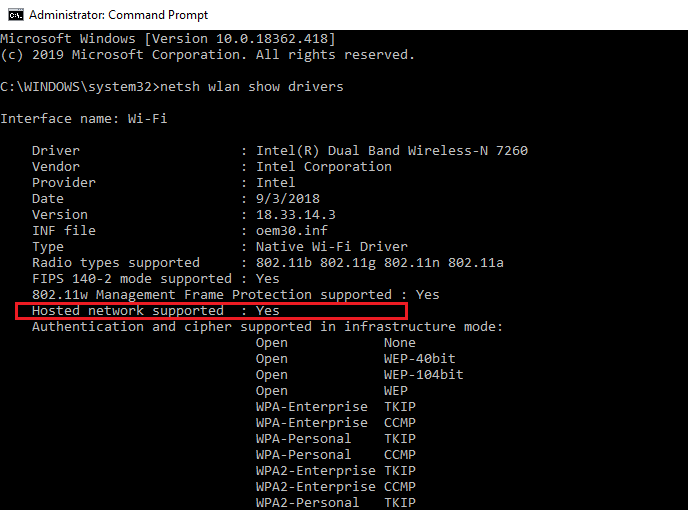
- On the windows search bar, type CMD.
- Right-click on Command Prompt and Run as Administrator.
- Type in the following command and press enter: netsh wlan show drivers
- Look for the line labeled Hosted Network Supported. If it says Yes then you can create a Windows hotspot using this method. If not, I have included another method below that allows you to share the VPN connection via Ethernet.
6. While still on the command prompt type in the following command: netsh wlan set hostednetwork mode=allow ssid=Name key=password. Replace Name with an appropriate name for your hotspot and password with a password of your choice.
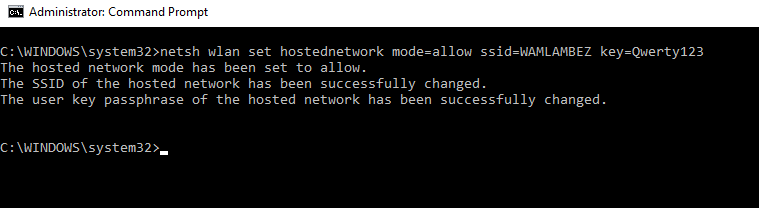
7. Turn on the hotspot by entering this command: netsh wlan start hostednetwork You will get a return message notifying you that it has started.

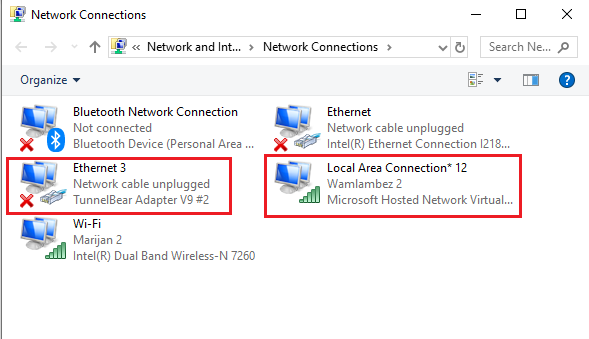
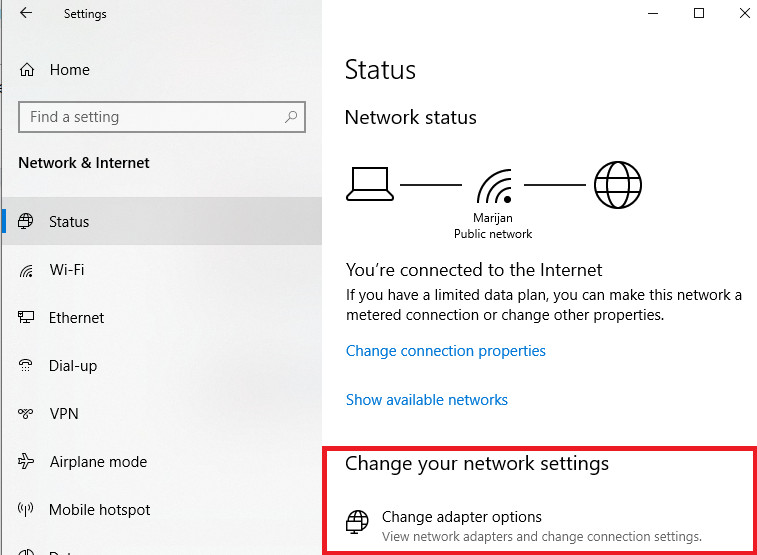
8. Open the Windows Settings menu and click on Network and Internet. You will see an option labeled Change adapter options option. Click on it.
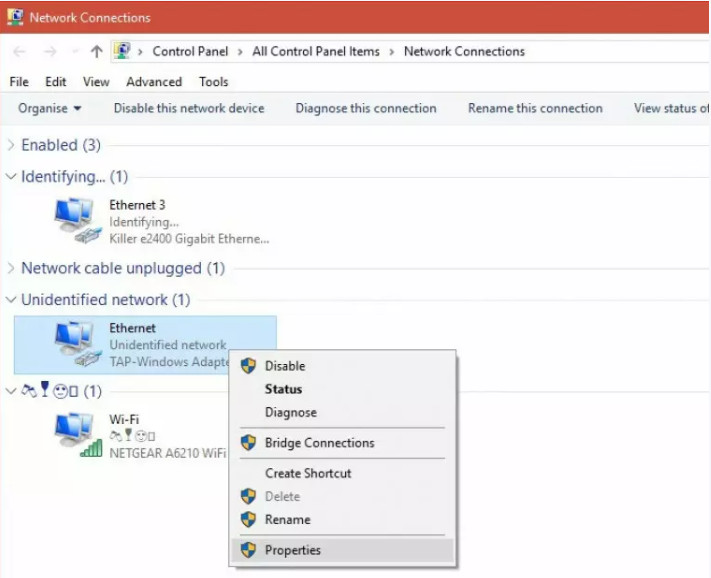
You should be able to see the hotspot you created and also your VPN connection. The VPN connection will be labeled by the vendor name or go by the generic name Tap Windows Adapter VPN.
9. Right-click on the VPN connection and go to its Properties.
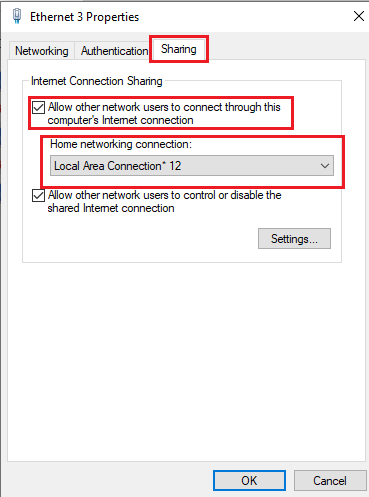
10. Go to the Sharing tab and check the box labeled Allow other network users to connect through this computer’s Internet connection. Below that where we have the Home networking connection, click on the drop-down arrow and select the hotspot that you created (Local Area Connection*12) and then click Ok.
11. Connect your Apple TV to the hotspot you created and it should now be VPN protected.
How to Share a VPN with Apple TV via Ethernet on Windows
- Connect your Windows PC to the internet via WiFi.
- Launch your VPN and connect to the server you want to use. Make sure the VPN is using OpenVPN connection protocol.
- Connect the Apple TV to your computer using an ethernet cable. All Apple TV models have an ethernet port.
- Open the Windows Settings menu click on Network and Internet. You will see an option labeled Change adapter options option. Click on it.
5. You should now be able to see a list of all your available connections including the VPN connection you established step 2. It will have the name of the VPN vendor or the generic name Tap Windows Adapter VPN. Right-click on it and go to properties.
6. Open the Sharing tab and check the box labeled Allow Other Network users to connect through this computer’s Internet connection. Below that where we have the Home networking connection, click on the drop-down arrow and select your Ethernet connection then click Ok.
7. Your Apple TV should now be VPN protected but you can restart it just to be sure.
How to Create a VPN-Protected Hotspot on MacOS
Unlike Windows, Mac OS cannot create a WiFi hotspot using the same WiFi you are connected to.
You either connect to the internet via Ethernet and then create the hotspot or install a second WiFi adapter like a USB dongle and use it to connect to the internet while you create a WiFi hotspot using your computer’s integrated WiFi adapter.
Note that for this method to work, you need to manually configure your VPN on the built-in macOS VPN client as opposed to installing the dedicated VPN application.
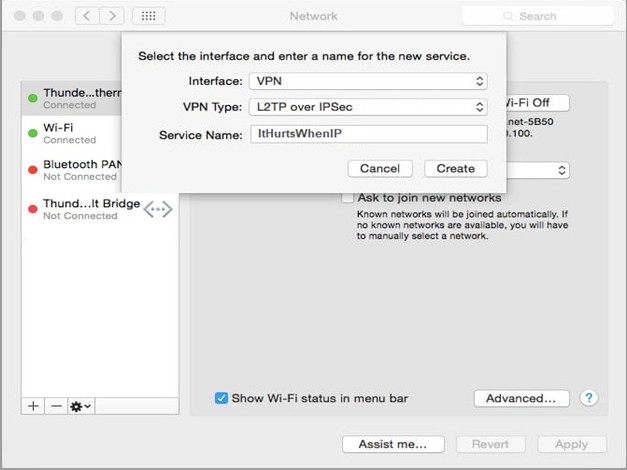
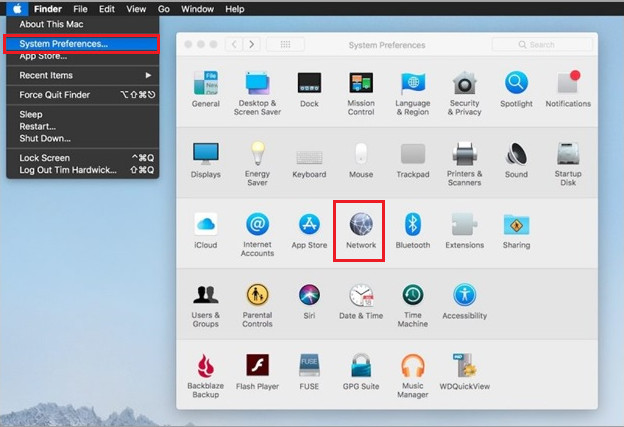
- Sign up to the VPN of your choice and manually configure it on Mac OS. To do this, go to System Preferences, open Network and click on the plus (+) sign at the bottom left.
A new window will appear.

Set the interface to be VPN and let the VPN type be L2TP over IPSec. In the Service Name field, enter the preferred name of your VPN connection.
Click on Create to register the connection.
2. Click on the VPN connection you created from the left pane to finish configuring it. You will be required to enter the Server Address you want to connect to and Account Name. You can get this information by contacting your VPN’s support team.
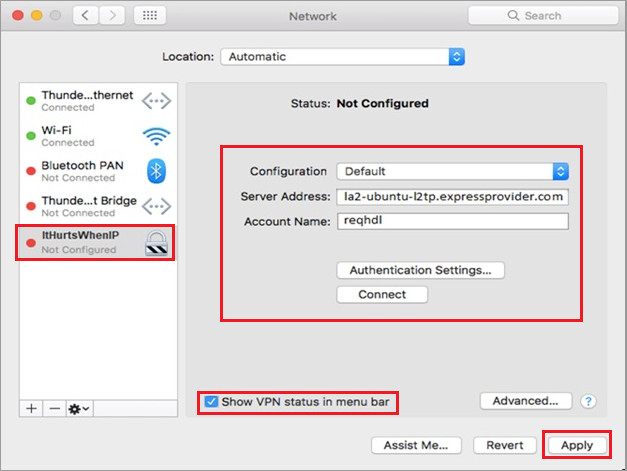
Leave the Configuration field as Default and make sure you check the box labeled Show VPN status in menu bar.
3. Now go to Authentication Settings and enter the VPN password provided from your VPN. Below that where we have Machine Authentication, use the IPSec key as the Shared Secret. 12345678 is the default IPSec pre-shared key.
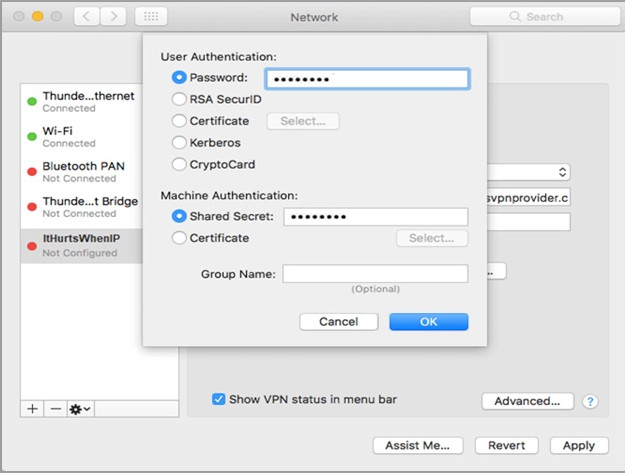
Click Ok to finish authentication.
4. Now click on the button labeled Advanced. Check on the box labeled Send all traffic over VPN connection and Apply the settings. Your VPN connection is ready.
5. Click on the VPN connection from the left pane and hit the Connect button. You are now connected to the VPN server address that you entered. What remains is to extend the connection to Apple TV.
6. Open System Preferences go to the Sharing menu and open Internet sharing. Proceed to Share your connection from the VPN connection you created To computer using WiFi.
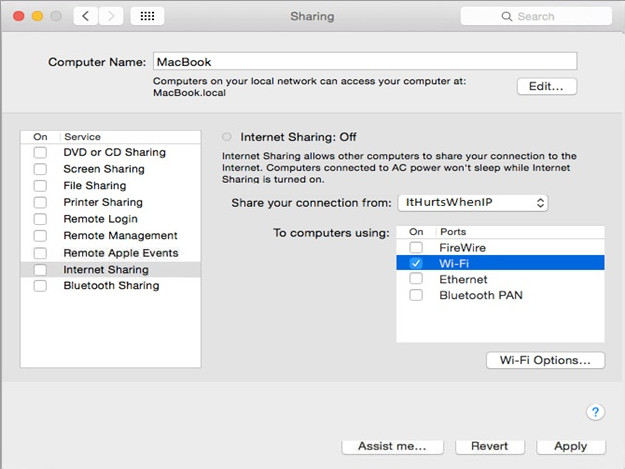
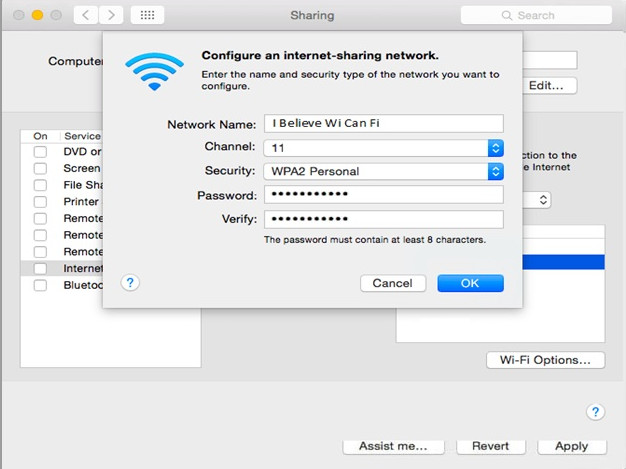
7. Open WiFi options and fill in the fields appropriately. Enter a Network Name of your choosing, leave Channel as default, use WPA2 Personal for Security and create a strong Password. Click Ok when done.
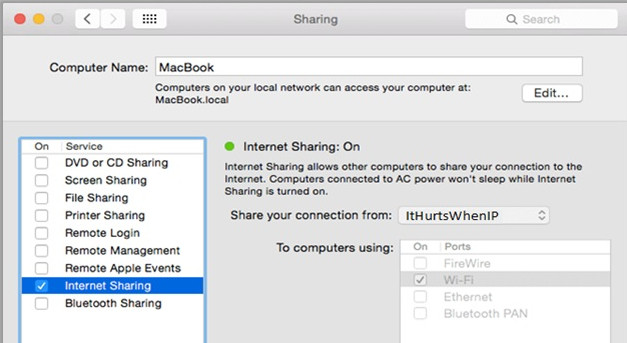
8. Now enable Internet Sharing by checking the box alongside it. A green light will appear next to Internet Sharing to show that it is activated.
9. Now connect your Apple TV to the connection you have set up in step 7 and it will become VPN protected.
How to use a VPN on Apple TV using AirPlay and Mirroring
If you own a Mac and iOS device then you can skip the whole process of setting up the VPN on a router or creating a virtual router using your Mac computer and instead use the Airplay or Mirroring feature.
Here is how that works. You sign up to the VPN of your choice and install the dedicated application on the device you will be using. It could be an iPhone, iPad, or a Mac computer. Proceed to log in to the VPN and connect to the server you want to use.
Now open the streaming application that you use and find the movie or show that you want to watch. As long as the Mac or iOS device is connected to the same network as the Apple TV device, then you can use the Airplay feature to cast the video to your TV.
Mirroring is only available for iOS devices and will be perfect for non-streaming activities like playing games and browsing.
Now anytime you want to access geo-blocked content you just need to change the VPN server location on your iOS device or Mac computer. You get the same results but with less effort.
What is the Best Free VPN for Apple TV
I hate to break it to you but there is not best free VPN for anything. See, to run a VPN service you need servers. These servers need people to maintain them and the people will want to get paid. So then how does the VPN company pay them if its services are completely free?
Probably by selling your data to the same people they claim to protect you from.
I have no problem recommending a freemium though. This is a limited version of a premium product that is available for free. The problem is that these limitations make the VPN impractical for streaming.
For instance, TunnelBear has a freemium which limits you to only 500MB of data each month. How long do you think that would last if you are streaming a movie?
Conclusion
Apple TV does not make it very easy for you to use a VPN but does that mean that you miss out on all your favorite shows because they are unavailable in your region?
I don’t think so. I have given you at least 3 different methods that will allow you to use a VPN on your Apple TV. Use them.
But make sure that you choose the right VPN. It would be very sad if after the whole configuration process the VPN ends up not working for you. All the solutions on this list are excellent but if I was to go with one then it would definitely be ExpressVPN.
It’s not the cheapest option but you will get value for every penny you spend.